Sunday, March 31, 2013

Happy Easter!

Our Easter break has been mostly cold and snowy (except today!), so we have not been able to really work on the greenhouse project. However, we had a lot of indoor hobby time, so I decided to make this little thing as an Easter present to my friends' baby girl. 

Knock knock, what's in the carrot?
Peek-a-boo, teeny tiny Bunny!

Happy Easter, everybody! :)

note: Based on a pattern by Ana Paula Rimoli. 

Sunday, March 24, 2013

Inexpensive Solutions

When comes time to start sowing for the new season, whether it be for a vegetable garden or for flower beds, sowing pots and trays should not be complicated, and they should not cost too much. Garden centers sell plastic pots, paper pots, mini greenhouses, trays of all sizes, etc... But in my opinion, they are pricey, and usually unnecessary. There are other, cheaper solutions, and they are easy to find, as long as one knows what to look for.

Grocery stores are an absolute gold mine for gardeners who don't want to spend a fortune. There are so many containers and lids that can be put to use in the sowing season.

A bit of recycling
Yogurt, grapes, ice cream, chocolate goodies, meat, cream cheese and slush are only some examples of foods that come in very interesting containers. Some can be used as pots, others as water trays. Some lids are also excellent as water trays.

There are however a few things to remember when using recycled containers. First, every container and lid should be cleaned and disinfected before use in gardening. Also, holes should always be pierced in the bottom of sowing pots. This allows the excess water to escape and helps prevent the seeds from rotting.

When that's in place, you're good to go!!! Here are a couple of pictures showing examples on my use of recycled containers.

Chocolate goodies container used as sowing pot for romaine lettuce, placed in an ordinary water tray

Family pack ground beef container used as water tray, containing pots from plants I bought in previous years. 

When the containers are made of transparent plastic, it becomes even more interesting. They can then be used as mini greenhouses... as long as there can be aeration with the help of holes / spaces / openings.

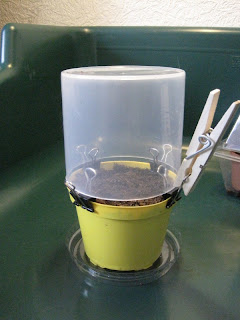
Mini greenhouse dome made with a q-tip container. 

From left to right: 1) Ready-made fish filet containers on top of eachother;  2) Dip and lemon containers that came with the fish filets - also on top of eachother; 3) A slush cup. 

The fish filet containers make perfect trays AND perfect greenhouse domes, as well as the smaller containers that came with it. The slush cup makes very effective individual mini greenhouses. They could even be used in a kindergarten or school group, where each child would have its own little greenhouse by the windowsill or on the terrace. Not only do they make pretty cute greenhouses, but their dome already has a hole in it to allow aeration! How perfect is that. :)

Grapes containers also make excellent mini greenhouses. There are already holes in the bottom and top of the containers, which provide both an escape for excess water and decent aeration. The lid often "snaps" on so it's easy to keep the greenhouse closed. It can be open when the seeds have sprouted. Sometimes, I also cut the lid free and use the container itself as a greenhouse dome.

I find it fun to be on the hunt for usable containers, and it also makes me feel good to recycle items this way. It makes my gardening hobby that much greener. :)

Tuesday, March 19, 2013

Status on the Greenhouse Project

It's snowing on little Denmark and inevitably on the location for our future greenhouse. The "All-stop" continues while my backyard looks like January in Canada. I don't remember ever saying that I was missing the snow after I moved here!

*sigh*


I can't deny it's pretty, though... but the last snow falls are never as pretty as the first in a season, especially when one has a big project laying in the garage, just waiting to be taken out and up!

On the plus side, my chili plants (2 kinds), my tomato plants (2 kinds) for the greenhouse (ha.. right) and my herbs are all doing their growing job on the windowsill. If the plants can be this optimistic, so can I!

I hereby place an order on sunshine for next week. Thank you.

;)

Wednesday, March 13, 2013

Oh Deer!

I came home pretty much at dusk today, and barely 10 minutes after I had walked through the door, my husband and I were telling each other about our day when he stopped mid-sentence and pointed outside. To our surprise and delight, a young deer was standing in our backyard, eating from the ground under the bird feeder! We tried to take pictures, but it's quite difficult at this time of the day. Those are the best ones I could get.

Right under the bird feeder

SO cute!

It stayed there a long time and eventually walked to the apple tree (small tree in the middle of the first picture). We sometimes throw apples or pieces of apple out there. I guess the deer must have enjoyed finding fruit in this cold snowy weather. 
After a little while, it walked back to where it was at first and layed down to rest! It was soooo cute! When we looked again about half an hour later, it was laying under the apple tree... and then some time later, it had gone. 

We've seen birds, squirrels, mice and similar, as well as a marten, hares and hedgehogs on our lot before, but it's the first time we see a deer! I'm going to throw more apples out there, that's for sure!

Monday, March 11, 2013

Mother Nature's mood swings

I wish I was just about to share pictures of the progress with the new greenhouse, but apparently, the few comfortable sunny days we had last week were just a tease. Mother Nature decided to share her mood swings with us and paint everything white again for a little while. Temperatures dropped again just under freezing point, and our greenhouse project came to a temporary halt.

Winter is back
So that was a little bit disappointing and surprising. I do not remember ever seeing snow in March in Denmark! Oh well, I've waited this long to have my greenhouse, I'm sure I can wait a couple more weeks. ;)

In the meantime, nothing is stopping me from starting the season indoors by the windows. A few weeks ago, I sowed cape gooseberry and 3 kinds of chili peppers They need to be sowed early as they take a long time to get to maturity. Some of the chili sprouted about a week ago and are growing nicely. I'm always so excited to see the young plants in the early season!

Chili "apache" 10/03/2013
This weekend, I sowed a few kinds of tomato and 5 kinds of herbs: Green and red basil, thyme, oregano and parsley. According to the little packets, they can all be sowed at this time of the year. I just hope the seeds I had leftover from last year were still usable and will sprout. I am not 100% sure that they were kept in the best conditions. I guess I will know soon enough. If nothing comes up, I'll have learned something!

herb tray
For sowing my things, I use mostly small plastic pots that I've kept over time when buying small plants or whatnot. I place them into plastic trays that are recycled from the kitchen. Ground meat plastic packs, for exemple, make perfect trays, as long as they are very well cleaned. I'm also always very interested by any transparent packaging. My herbs are sowed into empty grape packs. I find them perfect, as they already have small openings both on the bottom and top, and I can close them to create mini greenhouses! I've used them last year and found that I got good results. They are placed into the bottom part of a mini greenhouse, which transparent top broke last year.

Next time I go into a sowing round, though, I will probably use paper pots made of newspaper, since I now have used all my plastic ones. However, I'm still trying to figure out where I will place them, as I am also running out of windowsill space! Oh well, it's part of the charm of very early Spring. :)

Monday, March 04, 2013

Bitter Sweet

Well, I never had such a difficult decision to take in the garden, but after getting opinions from a lot of family members and friends, (Thank you!!)  the location for the greenhouse was decided, and a tree I really liked had to come down. But it is all for a good cause. The extra enjoyment we will get from placing the greenhouse exactly on that spot will all be worth it. To help me move on from seeing my tree come down, I took some cuttings, dipped them into rooting medium and put them in soil in the hope that I will be able to grow a new tree. :)

Bye bye tree

"Only" the stump to remove now. There's no going back


So the tree is gone, but on a very happy note, my greenhouse arrived today!!! I never had anything so big delivered to my door before. It was very impressive to see such a big truck turn onto our little blind street and park in front of our house. Then the whole side and roof of the trailer rolled open! With spot lights inside, it looked like a concert stage! Then a big hydrolic lift / arm / crane controlled by the delivery man picked up the huge heavy packs and carefully put them down on our lawn. It was an experience in itself to see it all happen!

Wooohooo!!! It's here!
The whole trailer opens up!

Impressive!

My greenhouse-to-be!!! 
Yayyy! Let the fun begin!

Saturday, March 02, 2013

Opinion Needed

 Hello to each of you who take the time to read my blog, and thank you! :)

Today, I have a favour to ask of you. I need your opinion regarding the location of our new greenhouse. Note that its dimensions are 309 cm in width, 457 in length and 201 in height at the lowest point, and 272 cm in height at the highest point. It is a fairly big one!

As shown 2 entries ago, the first location idea would be by the first terrace, close to the house, easy access, full sun and where we would always see it from our dining room. It involves, among other things, removing a couple of shrubs, which we were going to remove anyway (growing into the house and such issues). It also involves opening up the terrace (removing the fence) and eventually adding tiles to make the greenhouse and terrace work as a whole. However, my husband is a little afraid it would come to look quite cluttered. However, it would be close to the garden area and very easy to just step in the greenhouse to water some plants or sit with a cup of tea in the early season.

First location idea
The greenhouse would be right in front of the photograph there, with the door facing the terrace as soon on the plan above

Idea of how it would be placed. The fence would be gone. The proportions may be off
The second location would be by the second terrace, away from the house, still easy access and pretty much full sun. I like the idea as the greenhouse would be more out of the way and we wouldn't have to look at it in the winter when it doesn't actually look that good and that charming! However, it involves removing a plum tree that I really like, and I admit it hurts a bit to think about it. Then again, it pains me every time we have to cut down a tree. :(  But I admit the location would actually be ideal for a greenhouse, and as you can see on the drawing, this tree is actually placed very close to the edge of our garden. Perhaps it would need to be removed at some point anyway.


Second location idea
The greenhouse would go pretty much where that tree is. Our actual house is to my left on this picture


Again, proportions may be off, and of course the tree would be gone

What would you do? Is it silly to avoid a location just because of a tree? Should I get over it and just be happy about getting that greenhouse up? 

Thank you in advance for your input. Both my husband and I need this little help in taking the right decision, and we are curious to hear what you think about it. :)